Introduction
Welcome to the Thymis documentation! This documentation is intended to help you get started with Thymis on your devices.
Thymis is a project that allows you to generate, deploy, and manage your own IoT devices. It is based on NixOS, a Linux distribution that is built around the Nix package manager.
The component of Thymis that generates, deploys, and manages IoT devices is called the Thymis-Controller.
Thymis Enterprise is a commercial version of Thymis that allows you to generate, deploy, and manage devices on multiple machines. Getting started with Thymis Enterprise is similar to getting started with Thymis, but there are some additional steps that you need to take. If you are interested in Thymis Enterprise, please contact us at https://thymis.io.
Get started with Thymis by following the instructions in the Getting Started section.
Getting Started
In order to get started with Thymis, you need to access a running Thymis controller. The controller is the component of Thymis that generates, deploys, and manages IoT devices.
Currently, the Thymis controller can be easily deployed using a NixOS module. See the Thymis NixOS module for instructions on deploying the controller.
For developers
See the GitHub Readme for instructions on setting up Thymis for development.
Thymis NixOS module
In order to deploy the Thymis controller, you can use the Thymis NixOS module.
Installation (using flakes)
- Add the Thymis repository to your
flake.nix:
{
  inputs.thymis.url = "github:Thymis-io/thymis/v0.6";
}
- Add the Thymis module to your NixOS configuration:
For example:
Add flake inputs to NixOS Module specialArgs in call to nixosSystem (probably in flake.nix).
Add NixOS module thymis.nixosModules.thymis-controller to the configuration (for example in modules parameter of nixosSystem).
{
    outputs = inputs@{ self, nixpkgs, ... }:{
        nixosConfigurations.MY_SYSTEM_HERE = nixpkgs.lib.nixosSystem {
            system = "x86_64-linux";
            specialArgs = {
                inherit inputs;
            };
            modules = [
                YOUR MODULES HERE
                ./configuration.nix
                inputs.thymis.nixosModules.thymis-controller
            ];
        };
    };
}
- Configure the Thymis controller in your NixOS configuration (for example in
configuration.nix):
{
  services.thymis-controller = {
    enable = true;
    system-binfmt-aarch64-enable = true; # enables emulation of aarch64 binaries, default is true on x86_64, needed for building aarch64 images on x86_64
    system-binfmt-x86_64-enable = false; # enables emulation of x86_64 binaries, default is false
    recommended-nix-gc-settings-enable = true; # enables recommended Nix garbage collection settings, default is true
    repo-path = "/var/lib/thymis/repository"; # directory where the controller will store the repository holding the project
    database-url = "sqlite:////var/lib/thymis/thymis.sqlite"; # URL of the database
    base-url = "https://my-thymis-controller/"; # base URL of the controller, how it will be accessed from the outside
    agent-access-url = "https://my-thymis-controller/"; # URL of the controller to be used by the agents
    auth-basic = true; # whether to enable authentication using a basic username/password
    auth-basic-username = "admin"; # username for basic authentication
    auth-basic-password-file = "/var/lib/thymis/auth-basic-password"; # file containing the password for basic authentication
    # content will be automatically generated if it does not exist
    listen-host = "127.0.0.1"; # host on which the controller listens for incoming connections
    listen-port = 8000; # port on which the controller listens for incoming connections
    nginx-vhost-enable = true; # whether to enable the Nginx virtual host
    nginx-vhost-name = "thymis"; # name of the Nginx virtual host
  };
  # Configure the Nginx virtual host
  services.nginx = {
    enable = true;
    virtualHosts."thymis" = {
      serverName = "my-thymis-controller";
      enableACME = true;
      forceSSL = true;
    };
  };
}
Don't forget to replace MY_SYSTEM_HERE with the name of your system and YOUR MODULES HERE with the modules you want to include in your system, and to replace my-thymis-controller with the actual domain name of your controller.
Build and deploy your system:
sudo nixos-rebuild switch --flake .#MY_SYSTEM_HERE
- Access the Thymis controller at the base URL you configured (e.g.
https://my-thymis-controller/).
The password for basic authentication is stored in the file /var/lib/thymis/auth-basic-password. If not present, it will be generated automatically and filled with a random password. Use this password to log in to the controller, together with the username set during configuration.
Usage
Before diving into specific features, make sure that your Thymis setup is up and running. If you haven’t already, please refer to the Getting Started guide to set up the Thymis environment and install necessary dependencies.
Scenarios
1. Provisioning a New Device
Provisioning devices is at the core of Thymis. This involves creating a disk or SD card image with your desired NixOS configuration and deploying it to your target devices. Detailed steps can be found in the Provisioning a new device section.
2. Adding an Existing NixOS Device (Currently Unavailable)
If you already have a NixOS device that you want to manage with Thymis, you can easily add it to the Thymis controller. This allows you to monitor and update the device configuration remotely. Learn how to add an existing device in the Adding an existing NixOS device (unavailable, will 404) guide.
3. System Configuration
Thymis leverages NixOS’s declarative configuration, making it easy to manage and update device settings consistently. Learn more about setting up and modifying your device configurations in the System Configuration guide.
4. Terminal Usage
For more advanced control, you can directly interact with your devices via the terminal interface. This section provides instructions on how to access your devices remotely, execute commands, and troubleshoot issues using terminal commands. More details are available in the Terminal Usage guide.
5. VNC Usage
Thymis supports remote graphical access to your devices using VNC. This feature is useful when you need to interact with a device’s GUI remotely. The VNC Usage section explains how to set up and use VNC for your devices.
Tips for Effective Use
- Regular Updates: Regularly check for updates to Thymis and its modules to ensure that your deployments benefit from the latest features and security patches.
- Device Grouping: Use the device tagging feature to group similar devices, which makes managing large fleets of devices more straightforward.
Additional Resources
- Extensions (Under Development): If you're interested in expanding Thymis’s capabilities, head to the Extensions section to learn how to create and integrate custom extensions.
- API Documentation: For developers looking to interact with Thymis programmatically, the API page provides detailed information on available endpoints and how to use them.
System Configuration
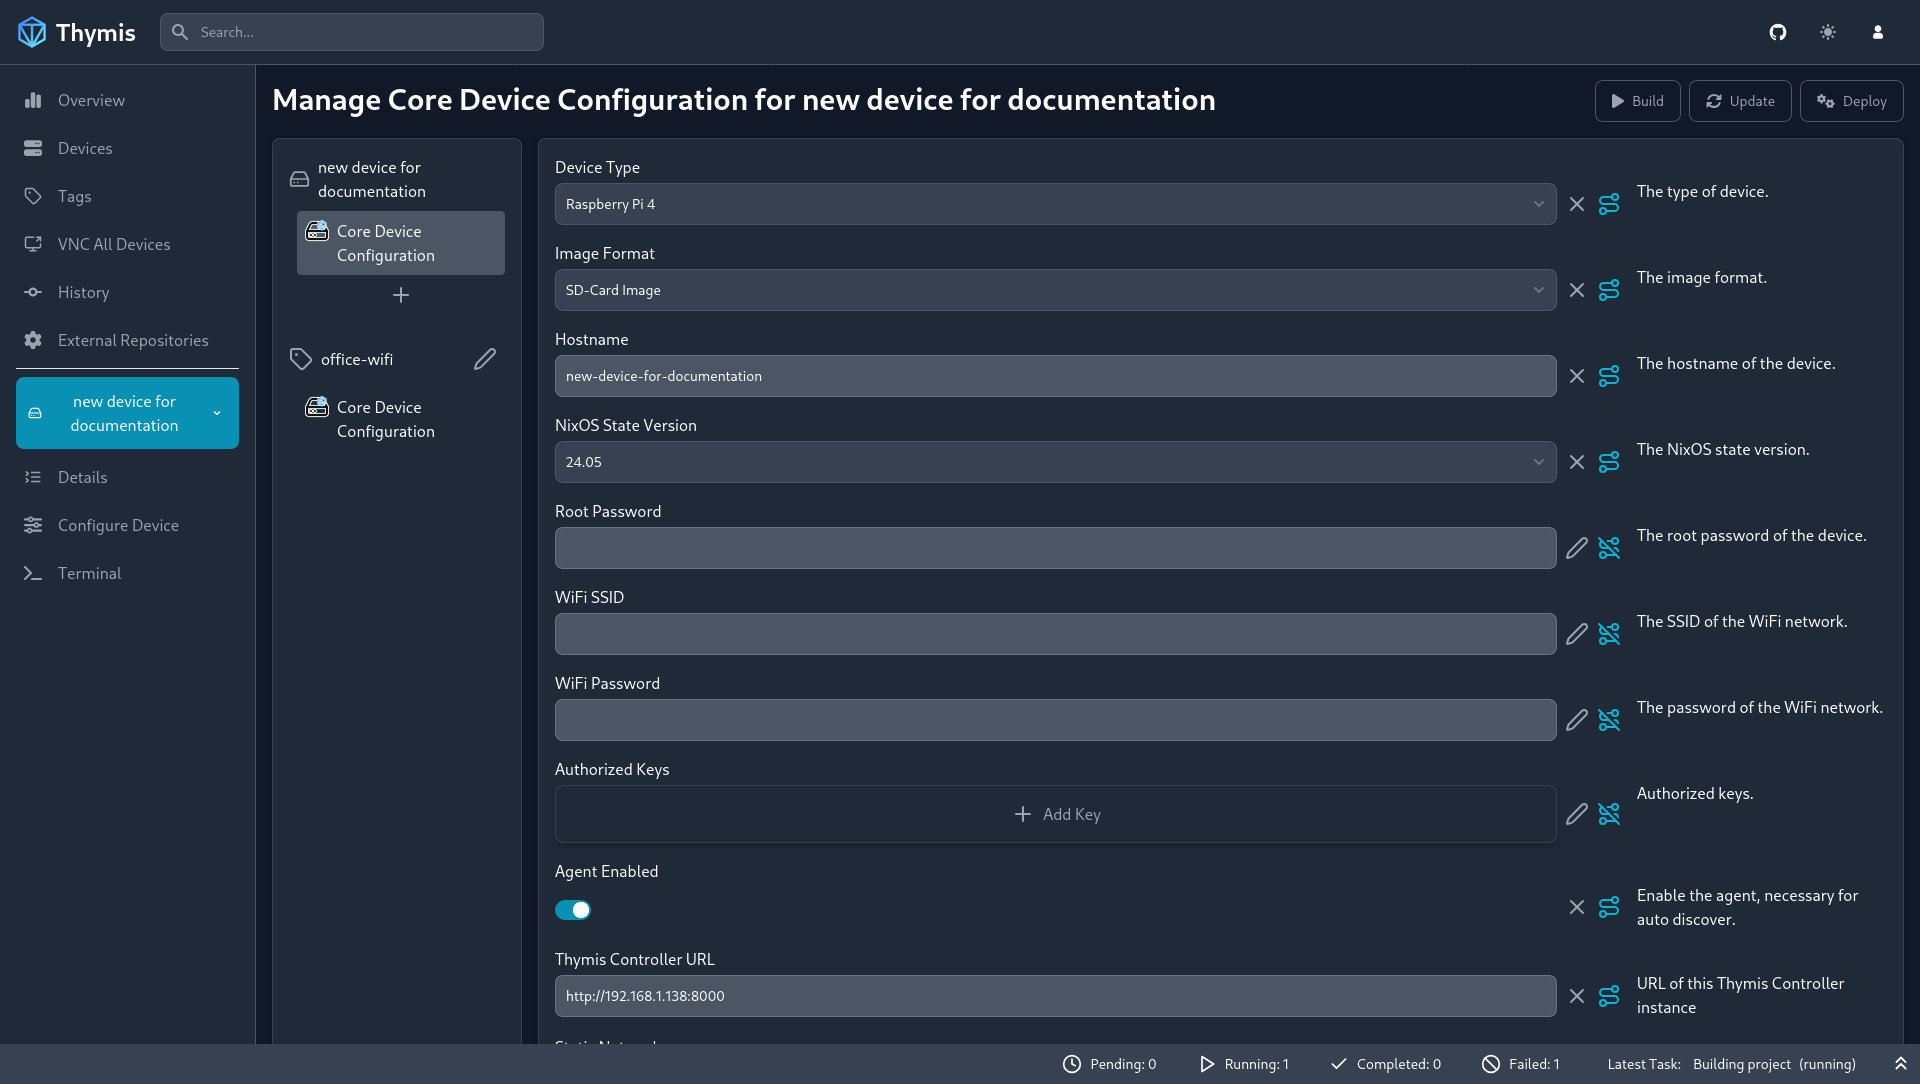
In the configuration interface, you can set up NixOS modules and services to include in your device's configuration.
Adding Modules
To add a module to your device's configuration, click on the Plus icon below your device's modules list. This will open a dialog where you can search for the module you want to add.
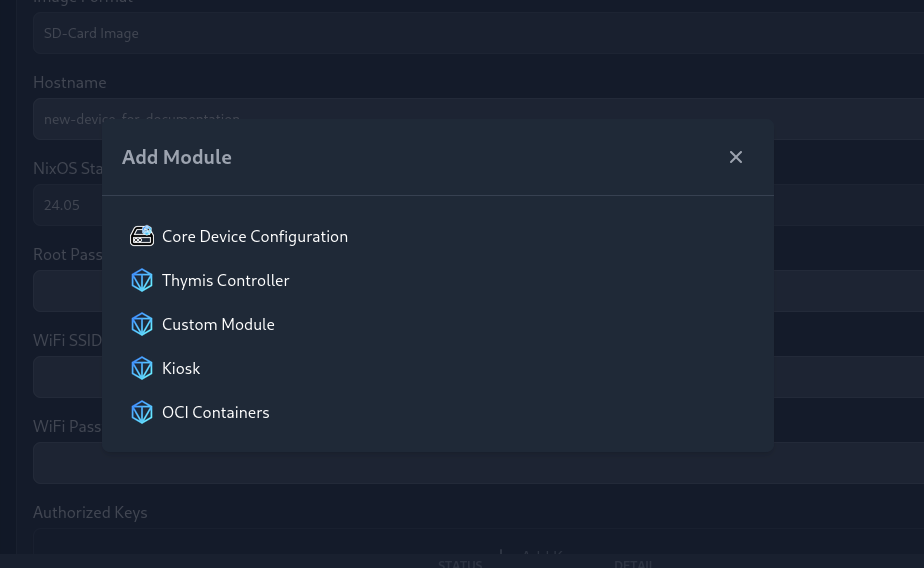
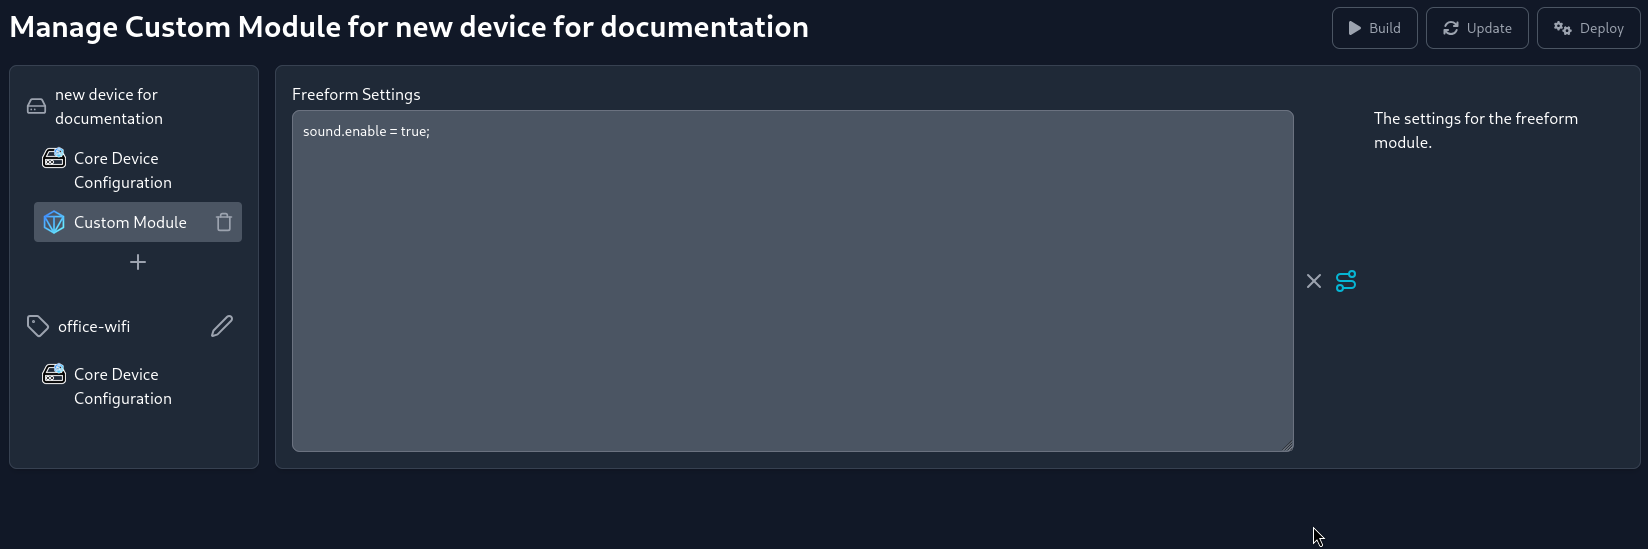
If you want to include custom NixOS module code, use the Custom Module option. This will add a new module to your device's configuration, where you can paste your custom NixOS module code.
Configuring Modules
To configure a module, click on the module's name in the list. In the middle pane, you can set the module's options and parameters. Notice that un-configured options are marked with a pencil icon on the right side of the option. Filled-in options are marked with an X icon, which you can click to remove the options content.
Terminal Usage
There are two ways to interact with your devices via the terminal:
- Terminal tab in the Sidebar
- Device Details page
Terminal Tab
- Select your device in the sidebar.
- Click on the Terminal tab in the sidebar.
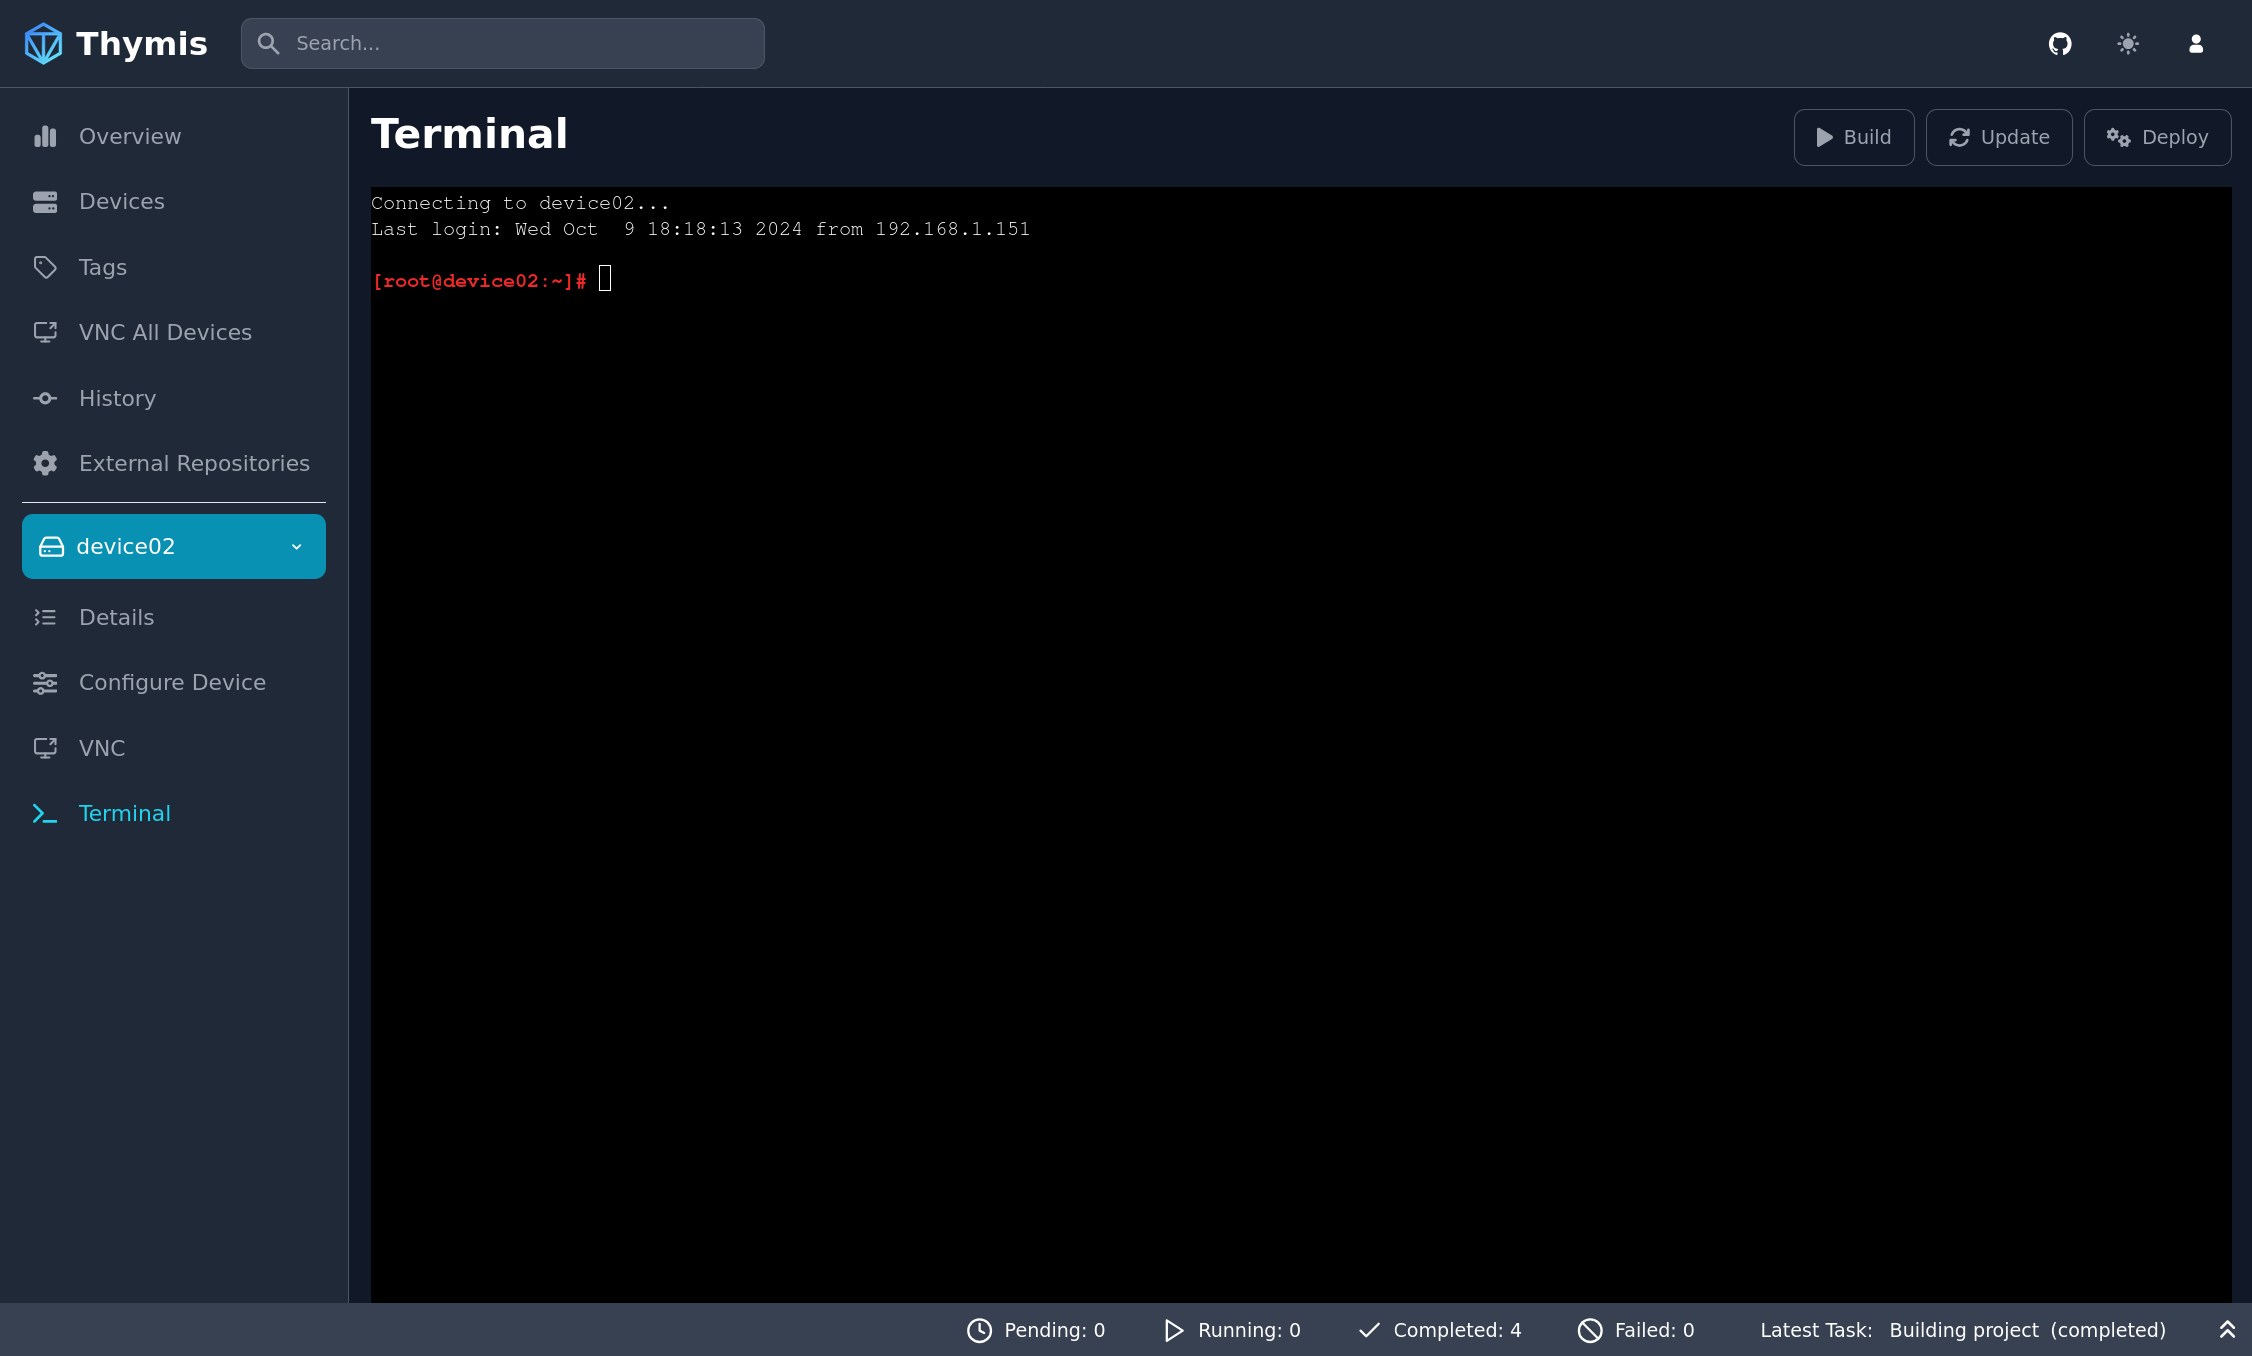
You will be presented with a terminal interface to interact with your device.
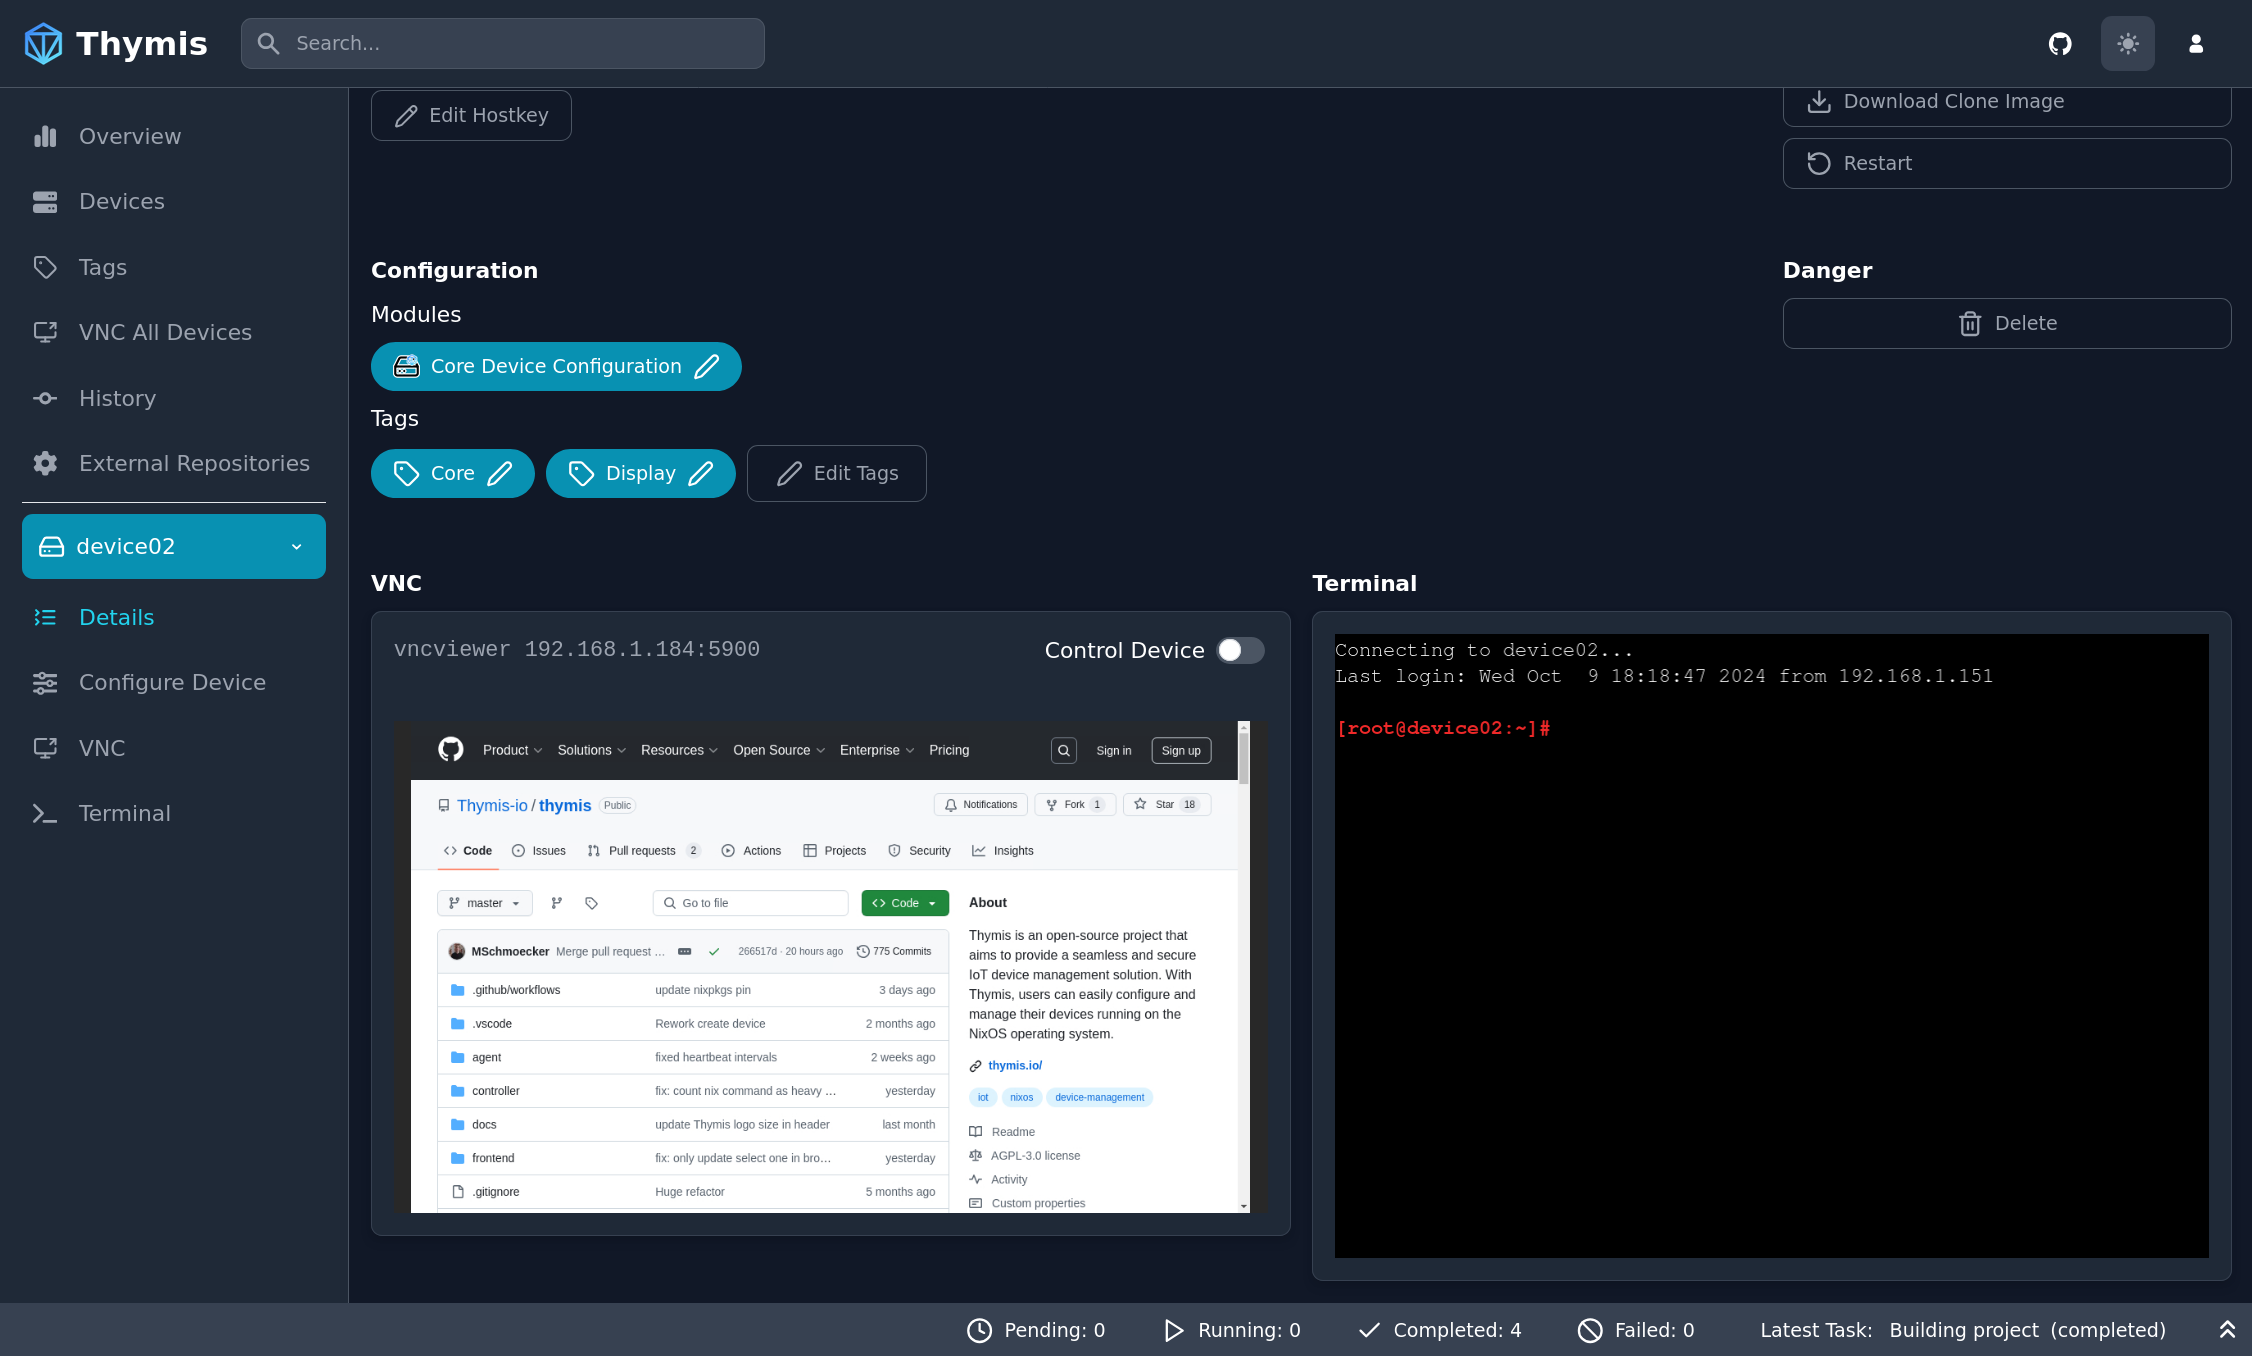
Device Details Page
- Select your device in the sidebar.
- Click on the Details sidebar tab.
On the device details page, a small terminal interface is available at the bottom of the page.
VNC Usage
The built-in Kiosk module provides a VNC server that allows you to view and interact with the device's screen.
When you enable the VNC server within the Kiosk module, the device will start a VNC server that you can connect to using a VNC client.
There are two places where you can interact with the device's screen:
1. VNC tab in the Sidebar
- Select your device or tag in the sidebar.
- Click on the VNC tab in the sidebar.
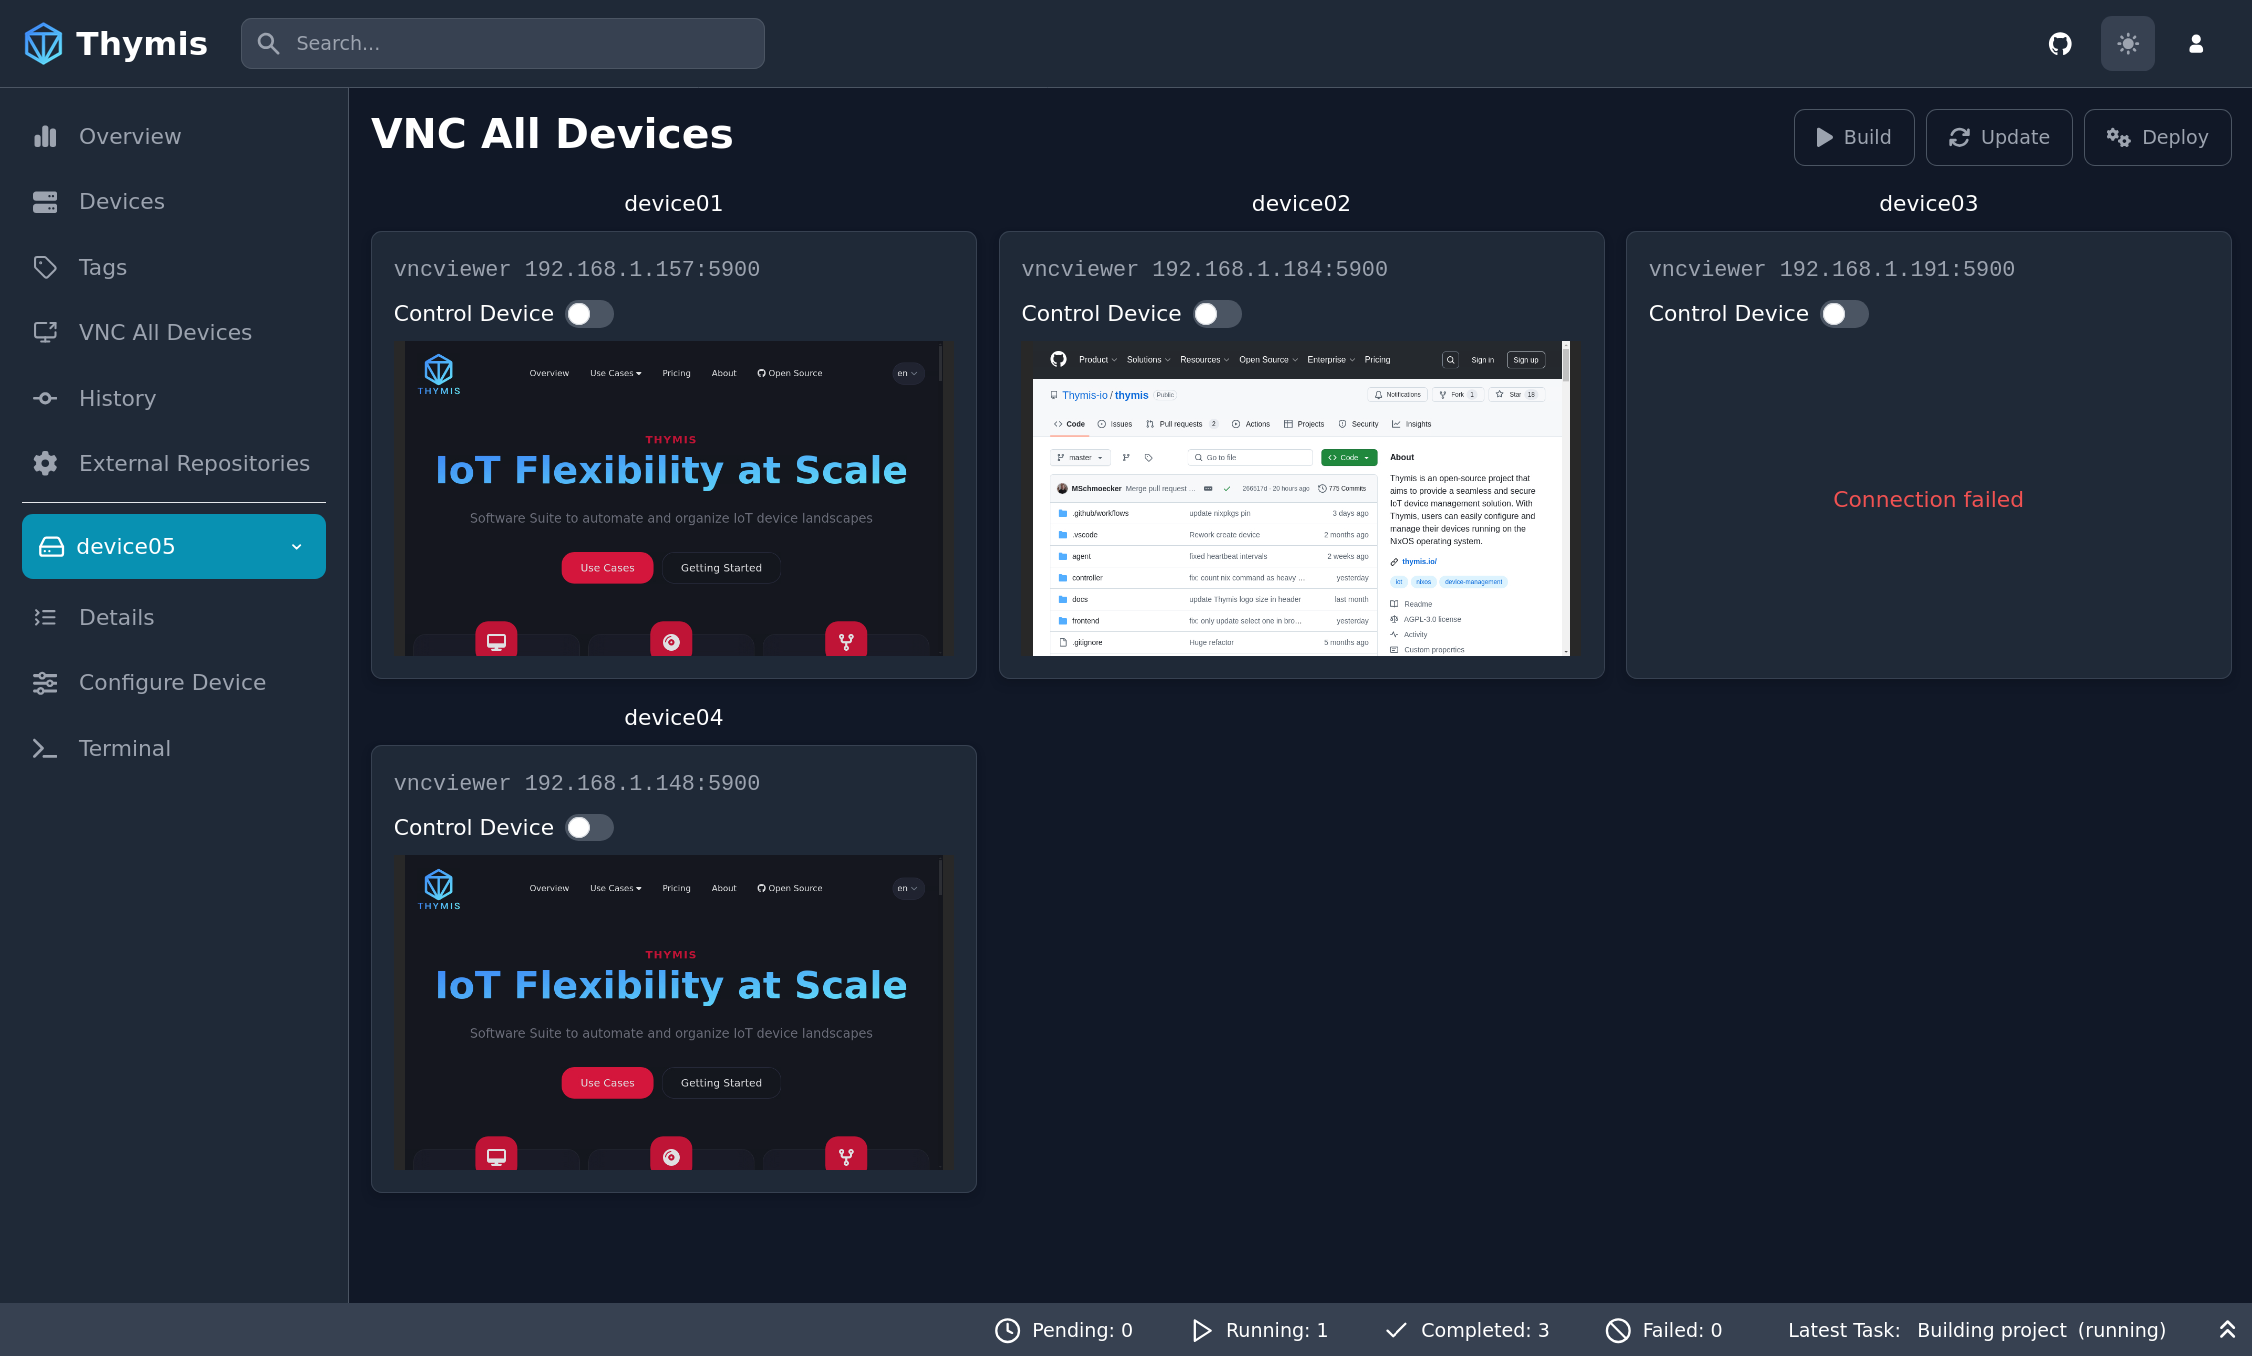
You will be presented with a VNC interface to interact with your device or all devices with the selected tag.
2. Device Details Page
- Select your device in the sidebar.
- Click on the Details sidebar tab.
On the device details page, a VNC interface is available at the bottom of the page.
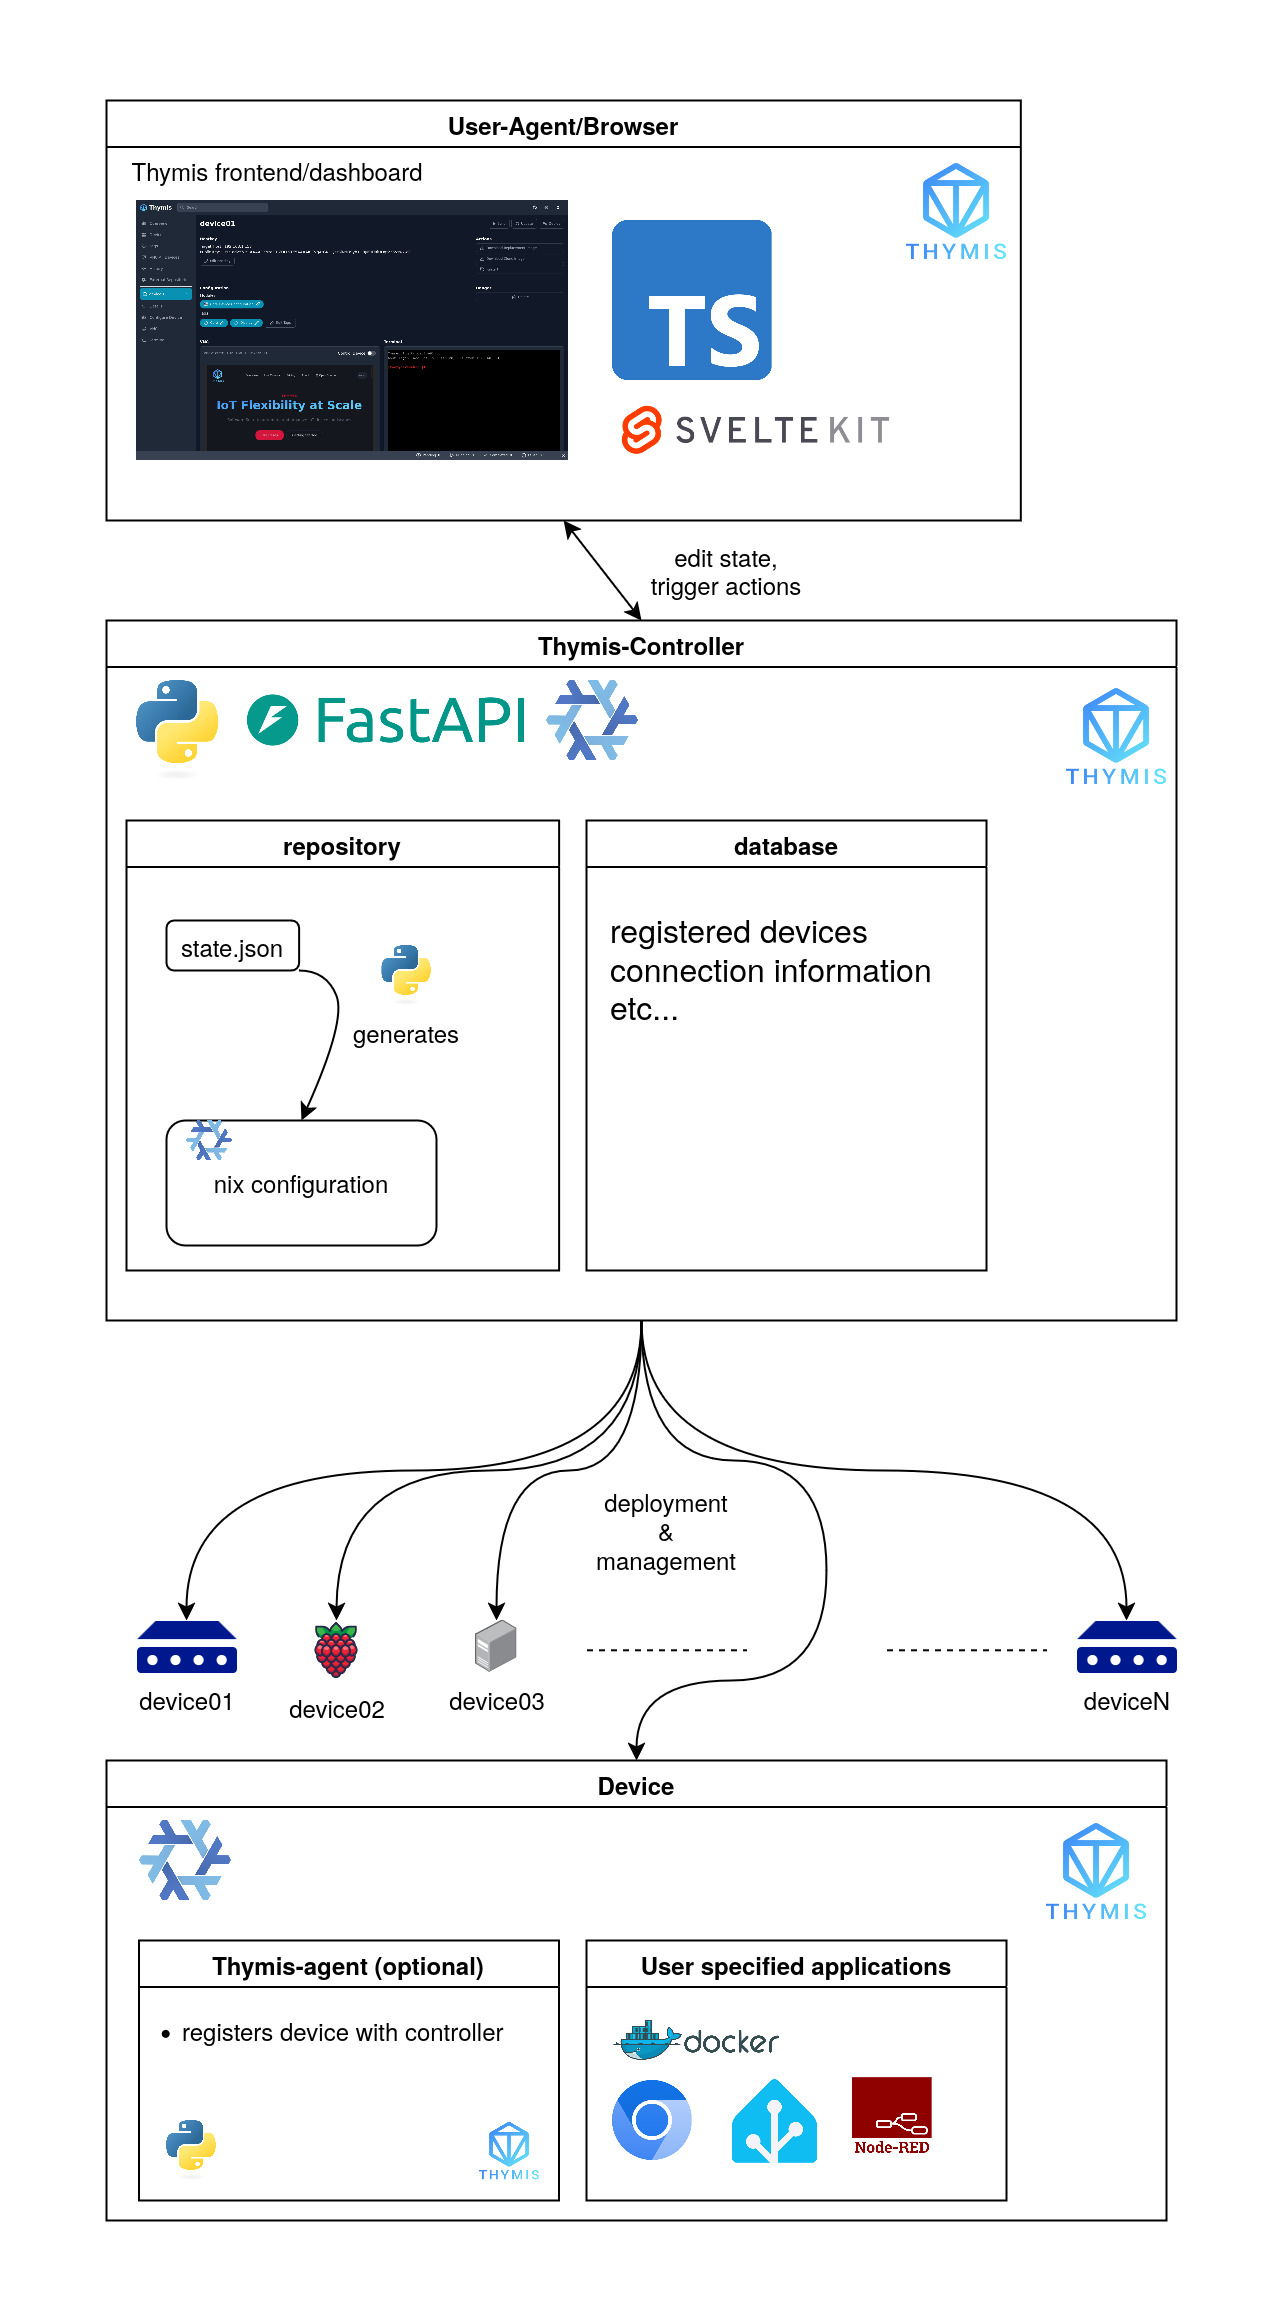
Architecture
The Thymis platform provides a scalable and secure solution for IoT device management using the power of declarative system configuration provided by NixOS. The architecture is divided into three main components:
Frontend/Dashboard (within User-Agent/Browser)
The frontend of Thymis is built using SvelteKit and TypeScript, offering a responsive web-based interface for interacting with the platform. This user-friendly dashboard allows administrators to provision, configure, and monitor connected devices.
The interface communicates with the backend controller using a REST API, allowing for actions like editing device states and triggering specific operations on the connected devices.
Thymis Controller
The Thymis Controller is the core component of the platform, responsible for managing the devices and orchestrating the interactions between the frontend and the devices.
The controller is implemented using FastAPI and Python, providing a REST API for the frontend to interact with. It also communicates with the devices using SSH, as well as facilitating communication with devices using the Thymis Agent.
Within the controller, two stores of information are maintained:
- Repository: Stores the device states as a JSON file (
state.json), which is then converted into NixOS configurations by the Thymis Controller. The resulting configurations are stored alongside thestate.jsonfile. The repository is backed by a Git repository, allowing for versioning and history tracking of device configurations. - Database: Manages device metadata, including registered devices and their connection details. This enables the Thymis Controller to efficiently handle device interactions and status updates.
Device Layer
Thymis supports the management of various devices, ranging from Raspberry Pi boards to larger servers. Each device can run specific applications defined by the user, ensuring flexibility in deployment.
We provide an optional Thymis Agent that can be installed on devices to facilitate secure communication and configuration management. The agent registers devices with the controller and ensures that the devices are in a known state.
Devices can run user-specified applications, such as Docker containers, or any other software that enhances the functionality and automation of the IoT setup.
Technologies in Use
- SvelteKit: Frontend framework for creating a dynamic and reactive web interface.
- FastAPI: Backend framework for managing device configurations and data.
- NixOS: Declarative system configuration tool for ensuring consistency and stability in deployments.
Extensions (Under Development)
In the External Repositories section of the sidebar, you can add external repositories to the Repository managed by Thymis.
We are handling external repositories using the Nix Flake system. This allows you to add repositories from various sources, such as GitHub, GitLab, or any other Git repository.
If a repository is added to the Thymis controller, and contains the string "contains thymis modules" in the README.md file, the Thymis controller will automatically detect the repository as a Thymis module repository.
It will be added to the PYTHONPATH of the Thymis controller, and the modules will be available for use in the Thymis controller.
The current format of an external repository is as follows:
.
├── README.md
├── pyproject.toml # Optional
├── poetry.lock # Optional
├── flake.nix
└── python_module_name
    ├── __init__.py
    └── modules.py
The pyproject.toml and poetry.lock files are optional and can be used to manage dependencies for the module during development.
The modules.py file should contain subclasses of thymis_controller.modules.Module that define the module's functionality.
API
The Thymis frontend communicates with the controller backend through a REST API.
We provide a OpenAPI specification for the API, which can be found at the /docs/openapi.json endpoint of the controller.